You spend countless hours putting together your models and painting them. Making sure they are protected is a priority. I’ve seen too many people toting around their models, unprotected, in things like tackle boxes. It’s all to save a buck, and to spend the money saved on miniature foam trays and army cases on more models.
My time is valuable to me, so going back to do touch-ups on models, where the damage could have been prevented, is not my idea of time well spent. All the models I carry around in my bag are in foam trays.
I’ve been making my own foam trays for a few years now, and they’ve held up really well. They’re really cheap to make too. I can make a foam tray that fits in a Sabol case that’s 1.5″ thick for about $3 – $4 a tray. Around here a pluck and pull tray is about $9 or more. So, I make 3 trays for the cost of one pre-made one; can’t beat that!
Below I will walk you through how to make your own foam trays. It’s easy to do, cheap, and you can customize them however you need.
The Materials Needed for Miniature Foam Trays
You only need a few items.
- PVA glue/Foam Glue
- Breakaway utility knife
- Foam (info below)
- Cutting surface. I like to use a self-healing cutting mat.
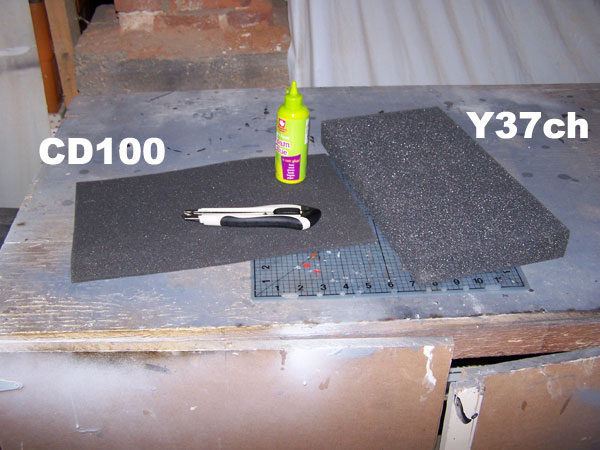
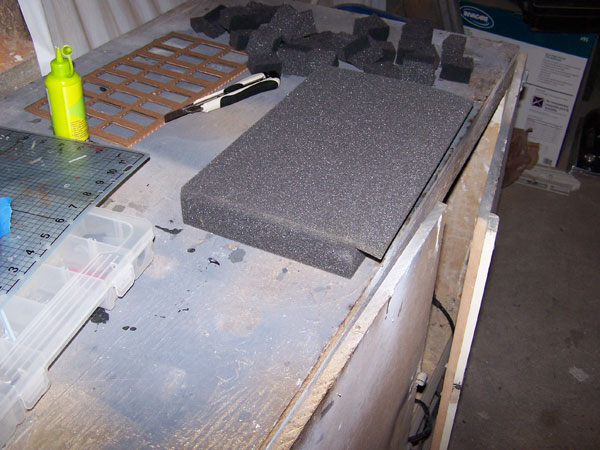
Here’s a shot of the materials you need. The glue I buy at a craft store like Michaels, Jo-Annes, AC Moore, etc. for about $2, and I can get about 4-5 trays out of it. This glue is called Foam Glue, and is made by Creative Hands. I’ve also used regular Elmers glue and it works just as well. Really, any PVA glue will work.
I’ve made a template that I use for this particular type of tray I’m making, which you’ll see below. I used a cardboard box, and just cut my slots out of that.
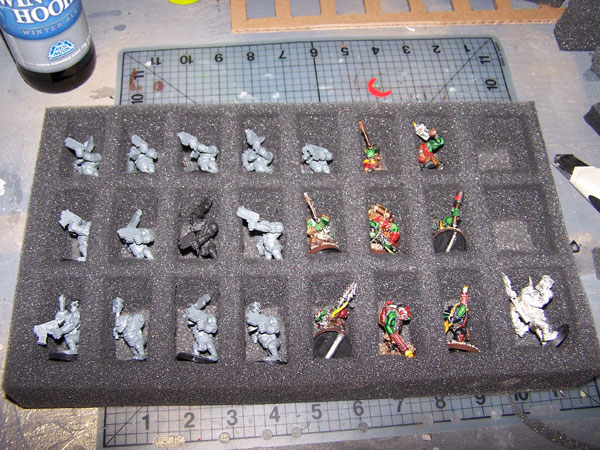
The tray I’m making is 1.5″ thick, and will fit 24 models, in my case Orks. The tray itself is 7.5″ wide by 13″ long, the same size as the Sabol trays.
You’ll see below that my tray and bottom are a bit bigger. I had ordered these ones a little long just to be safe, and I trim off the excess. Also, it’s cheaper if you order the foam in lengths, or widths, that allow you to get more then one tray from it. So, buying one piece of foam 26″ in length and 7.5″ wide and 1.5″ thick is cheaper then one tray at your exact dimensions.
Getting the Foam
What I do is order my foam from this site: http://www.foamorder.com/packing.html (link goes to their packing foam which is what I use)
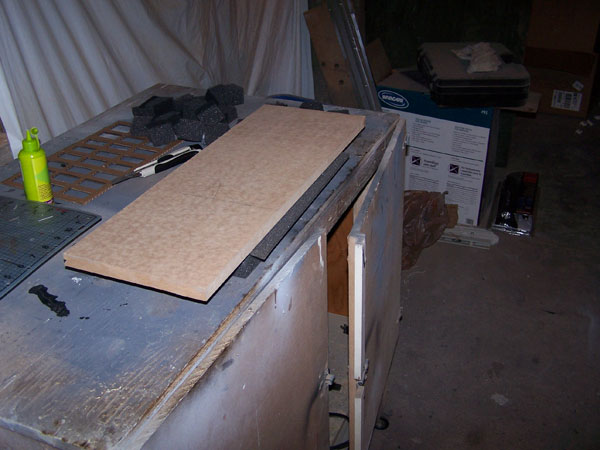
I use the Y37ch foam for the main part of my tray, what the models go into. I then use the CD100 for the bottom of the tray by gluing it on once I cut the slots out.
The CD100 I get in 1/4 thickness, again for the bottom of the tray. The Y37ch I get in whatever thickness I need for my models.
The foam I use isn’t as dense as buying the pick and pluck trays, but you can get denser foam from them then what I use, it just costs more.
To order, just click one of the types listed above, it doesn’t matter which, and then click on the first shape listed: square or rectangle.
They will cut your foam to size, so just measure the trays you do have, and you can order it in that size from these guys. Then you just have to cut out your slots, which is easy and covered below. What I do is use a breakaway utility knife to cut the slots. I find these work best because you can extend the blade out a few inches, allowing you can cut through the foam easily.
Measuring Out the Foam Tray
The slots are 1″ wide by 2″ tall, and works equally as well for most Necrons, Tactical Marines, and things that aren’t overly dynamic in pose.
The last slots on the tray are a bit larger, being about 2″ x 2″, the result of measuring off the 1″ x 2″ slots, and they work well for things like my Nobz and other larger models.
I leave a 1/2″ edge around the sides and each slot for stability. Actually, the edge between the 3 vertical slots is a bit under 1/2″, so that I can fit 3 tall.
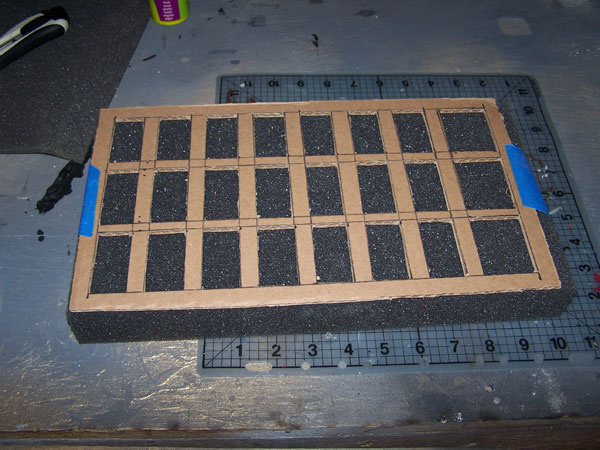
I just tape the template on the tray, and use black spray paint to define the slots. Let it dry for about 10 minutes, so you don’t get paint all over you when cutting the foam.
The line on the right is me marking off the excess which I trim off. For that I used a permanent marker. The permanent marker works great for marking your slots as well if you haven’t created a template.
Cutting Out the Slots
I start the knife at an angle to get my initial cut. Once I start cutting, I raise the knife 90 degrees to the tray. Then I use a sawing action, so that I can cut to the bottom of the tray and get a straight cut in the corners.
Once I’ve hit the first corner, I turn the knife around and go back the other way, towards where I started from, so that corner is cut. It takes a little practice, and you may find your own method, this is just what I’ve found useful.
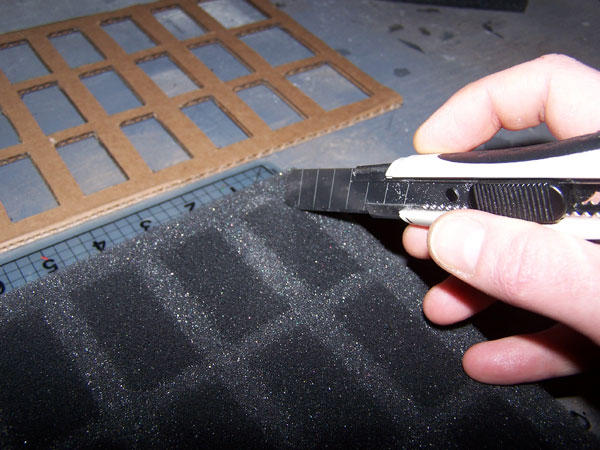
I do my cutting on a self-healing mat to help avoid dulling the tip of the knife.
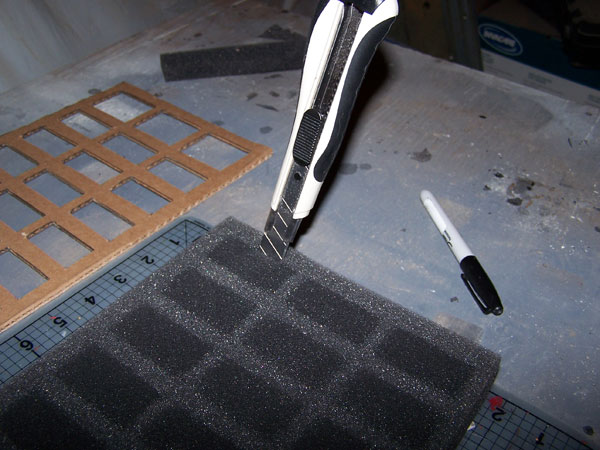
Just go ahead and make all your cuts. I find it’s easier to make all your cuts one way, say all the long sides of the slots, then turn the tray around and make the other cuts, the short sides. It’s a bit tedious, but after you’ve done a few trays you can make all these cuts in about 10-15 minutes.
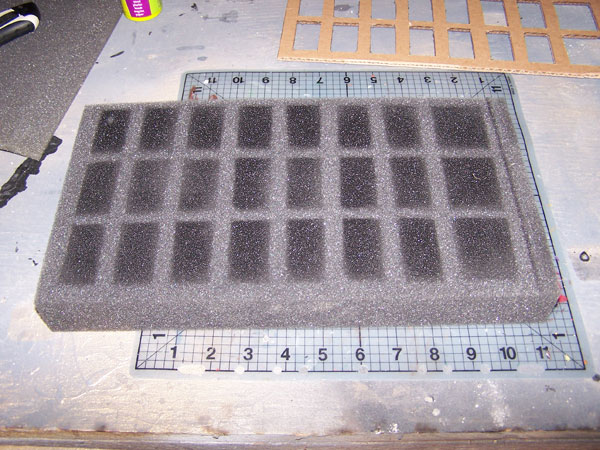
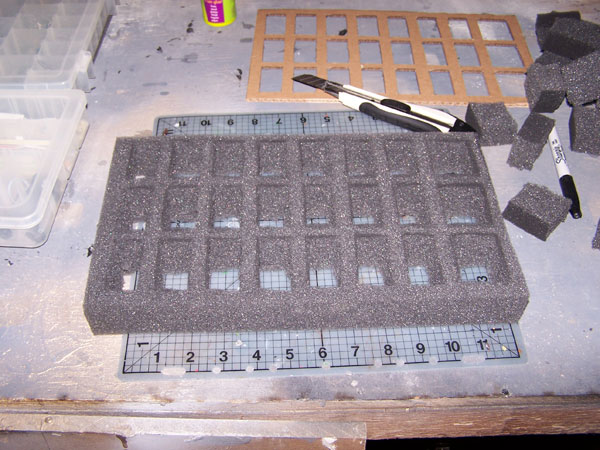
It’s Time to Pluck!
Once all the cuts are done, you pluck it out. Don’t pluck them out as you are making your cuts though, do it once all cuts are made. If you pluck them out as you do them then the tray loses density, and it’s harder to make the rest of your cuts. Plus, you can tear the slots easily this way.
If you did your cuts deep enough, and all corners cuts meet, then plucking it out is easy, but be careful. I keep one hand on the top of the tray while I pluck out the slots.
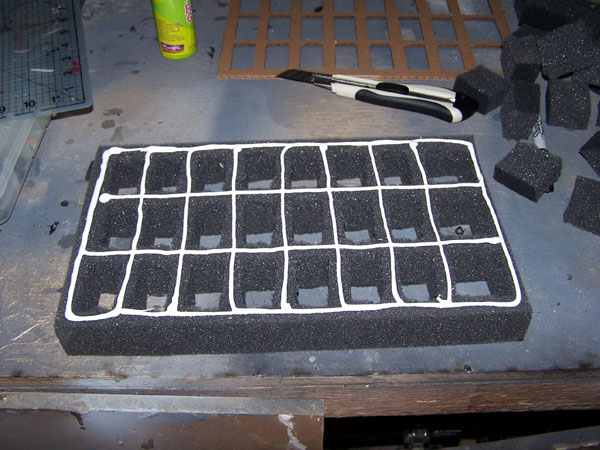
Gluing on the Foam Tray Back
Now it’s time to glue on the bottom to the foam tray. I use a liberal amount of glue, and cover all areas on the bottom.
Put the bottom piece on, and weigh it down with something to ensure even pressure. I normally let my trays dry overnight before I use them. However, I’ve also used them in a few hours after gluing when in a rush.
Once the base is thoroughly dried, I trimmed off the excess I had and I’m done.
Wrap-up
Making your own foam trays is not hard. It takes a little time, mostly waiting on glue to dry, but saves you so much money in the long run.
These trays really do hold up well. I am still using trays today that I built in 2007. I have never had one of these trays fall apart, and they remain just as functional today as the day I made them.
If you’re a 40K player, and looking for more ways to save cash, then I’ve got a great resource for just that on my other blog.
Also, if you’re a new hobbyist, and are looking for other things you’ll need, then check out our article on essential supplies you need, also on my other blog 😉
- Marvel: Crisis Protocol Foam Inserts, Trays & Storage Ideas - December 19, 2019
- The Best Battle Foam Case – What’s Right for You? - July 31, 2019
- Infinity Game Storage Cases You’re Going to Love! - July 23, 2019
Question: once the foam tray is complete, what do you put it in?
I don’t imagine that you only use foam and don’t put the whole assembly into some plastic container of some sort. I can’t seem to find or think of a proper search term for empty storage for a foam tray such as this.
These trays are sized to fit inside a Sabol case. I did an article on different Sabols cases here: https://miniaturestorage.com/sabol-designs/
Of course, you could make these any size you want depending on what you need to put in them and the case you plan to put them in.
Oh, and the term you’re looking for is “miniature carrying case”.
Stumbled upon this and creativetwilight for the painting tips and saw the tutorial for this, which I will use. My purpose is a bit smaller scale though, as I am painting minis as PCs and NPCs for D&D, so I will likely only need 1 or 2 of these foam trays and a case for them, so Sabol is a bit of overkill, plus all the mini cases I’ve seen already have foam in them, so there would be no point in making my own trays. I’ll probably have to go to a storage store like The Container Store to… Read more »
Ah, gotcha. In that case (no pun intended), I also did an article on D&D storage, so smaller cases. Most of the cases mentioned in the article have foam already, but those small cases are pretty cheap already: https://miniaturestorage.com/dd-miniature-storage/
Is there any easy way to find this foam more locally towards eastern U.S.A.? The shipping and handling to Virginia is nearly $40, plus the $40 for 4 sets of foam. Still no terrible, but since its a DIY id assume it wouldnt cost nearly as much as a premade. The shipping doubles the cost. :/
Damn. They’ve gone up. It’s admittedly been a few years since I’ve had to order any, but then it was around $18 to the eastern US – maybe 3 years ago.
I haven’t hunted for any other foam suppliers but there might be a few out there. I just don’t know of any off the top of my head.
Another option is a local craft store. I know Joann Fabrics has some foam. It’s not as dense as what I’ve listed above but I’ve known other people to use it.